Rich, engaging content is a must-have for your website. Once visitors land on your site, good content entices them to stay and explore. One of the easiest ways to do this is to add videos to your WordPress site.
As our attention span decreases, creating content that will quickly capture that waning attention is ever more important. Short videos allow you to present important information in an engaging way.
You can add videos to WordPress easily by embedding them or uploading them directly to your media library. Continuing reading to learn more about:
Of note, it is recommended that you embed videos over uploading them directly to your website. Especially if you have many videos, uploading them directly will slow down your website, causing a poor user experience for your visitors.
Embedding Video in WordPress
Embedding is the recommended option for adding videos to your WordPress website. By uploading the videos first to YouTube or Vimeo, then embedding them via a URL or code from the third party allows you to use their server resources instead of your own.
This way, you protect the speed and performance of your own website — ensuring a positive user experience for your site visitors. In addition, the servers at YouTube and Vimeo are also specifically designed to serve high-quality video content.
Embedding a video is a very simple process. Below are instructions on how to embed a video to your WordPress site using a third-party.
Embedding Video in a Post or Page
Before following the steps below, you must first upload your video to YouTube or Vimeo.
- Log in to the WordPress Dashboard.
- Navigate to Pages or Posts.
- Edit an existing page or post, or create a new page or post.
- Navigate to the YouTube or Vimeo Gutenberg block by clicking on the + sign in the upper left corner or within the edit screen.
- Choose the block for the third-party video service you’re using. For this tutorial, we chose YouTube.
- Copy and paste the YouTube URL for your video in the block, then click Embed.
- Click Publish or Update to save your changes.
Embedding Video in a Widget Area
Similar to the above, before following the steps below, you must first upload your video to YouTube or Vimeo.
- Log in to the WordPress Dashboard.
- Navigate to Appearance > Widgets.
- Scroll down until you see the Video widget, then move it over to a widget area.
- Add a title for your video, then click Add Video.
- Click Insert from URL, copy and paste the YouTube or Vimeo video URL into the field, then click Add to Widget.
Of note, you can also upload a video from your media library via the instructions below. However, again, it is not recommended.
- Complete the task by clicking Save.
Uploading Video to WordPress
The only positive to uploading a video is that you have complete control. The video will live on your hosting server and only those who land on your website will see the video. However, the benefits end there.
In addition to the video potentially using too many server resources, you also miss out on the benefits of hosting the video with a third-party. If you upload your video to YouTube first, for example, you have the added advantage of YouTube users viewing and interacting with your video. YouTube also has easy sharing capabilities, allowing users to share your video with their networks without much fuss — something you would certainly miss out on if you upload the video directly to your website.
If you have no desire in making your video easily searchable and shareable, or do not expect many people to view it, uploading it directly to your site is an easy task. This may be the case if you have a site used by a small group of users and thus the video would only be important to them.
Follow the instructions below to upload and add a video to WordPress:
Uploading Video to the Media Library
- Log into your WordPress dashboard.
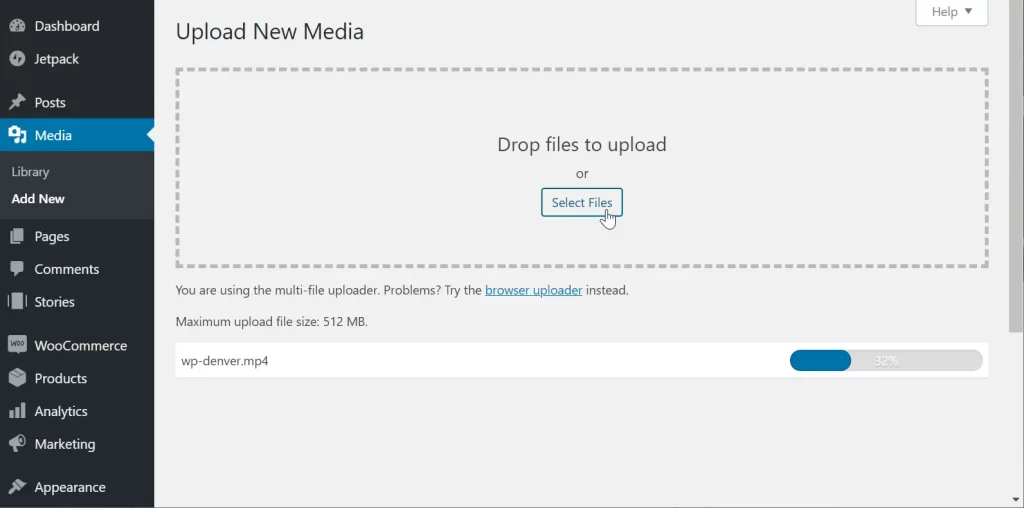
- Navigate to Media > Add New.
- Click Select Files, select the video file then click Open. You can also drag and down the file from the File Explorer folder on your computer to the upload area within the WordPress dashboard.
- The status bar will show 100% once the video has been uploaded.

Adding Video to a Post or Page
Once you’ve uploaded the video to your media library, you can add it to a post, page, or widget area (use the widget instructions above) as you would add an image. Follow the directions below:
- Log into your WordPress dashboard.
- Navigate to Pages or Posts.
- Edit an existing page or post, or create a new page or post.
- Navigate to the Video Gutenberg block by clicking on the + sign in the upper left corner or within the edit screen.
- Within the video block, click on Media Library, select the video you just uploaded, then click Select.
- Make sure you click Publish or Update to save your changes.
For more WordPress tips and tricks, check out our WordPress Performance!

